
Wedgemount Lake Overnight Backpacking Trip: Garibaldi Provincial Park
British Columbia
I first set my sights on this beautiful glacial lake via the instagram pages of a handful of Vancouver based friends several years ago and knew that I needed to add it to my bucket list immediately. I am always apprehensive about sharing locations - The Leave No Trace Center for Outdoor Ethics have recently posted their Social Media Guidelines, their first point being in regards to geotagging and for the most part I do agree with them. However, with established campsites, a great reservation system, toilets readily available, ample parking at the trailhead, cell phone service for the majority of the hike in case of an emergency and regular checks from rangers (permit and safety) this hike up to Wedgemount Lake in Garibaldi Provincial Park, BC is one that I hope more people are able to experience for themselves.
The rundown
Location: Garibaldi Provincial Park, British Columbia.
Access: Turn right off Hwy 99, 13 km north of Whistler. The parking lot is located 2 km from Hwy 99 along a Forest Service road.
Distance: 14 km roundtrip; elevation change, 1,200 metres. The trail is steep in parts and can be slippery when wet.
Popularity: High
When to go: July through October.
Camping: Camping is permitted at designated campsites on the ridge near the hut and at Wedgemount Lake near the inlet from the Armchair Glacier - you can reserve those on the Parks BC Website.
Dogs: Not permitted in Garibaldi Provincial Park, unfortunately.
Cost: $26.30 CAD per night for two adults.
Note: Garbage facilities are not provided so please pack out what you pack in. There are two pit toilets as well as an emergency shelter at Wedgemount Lake.

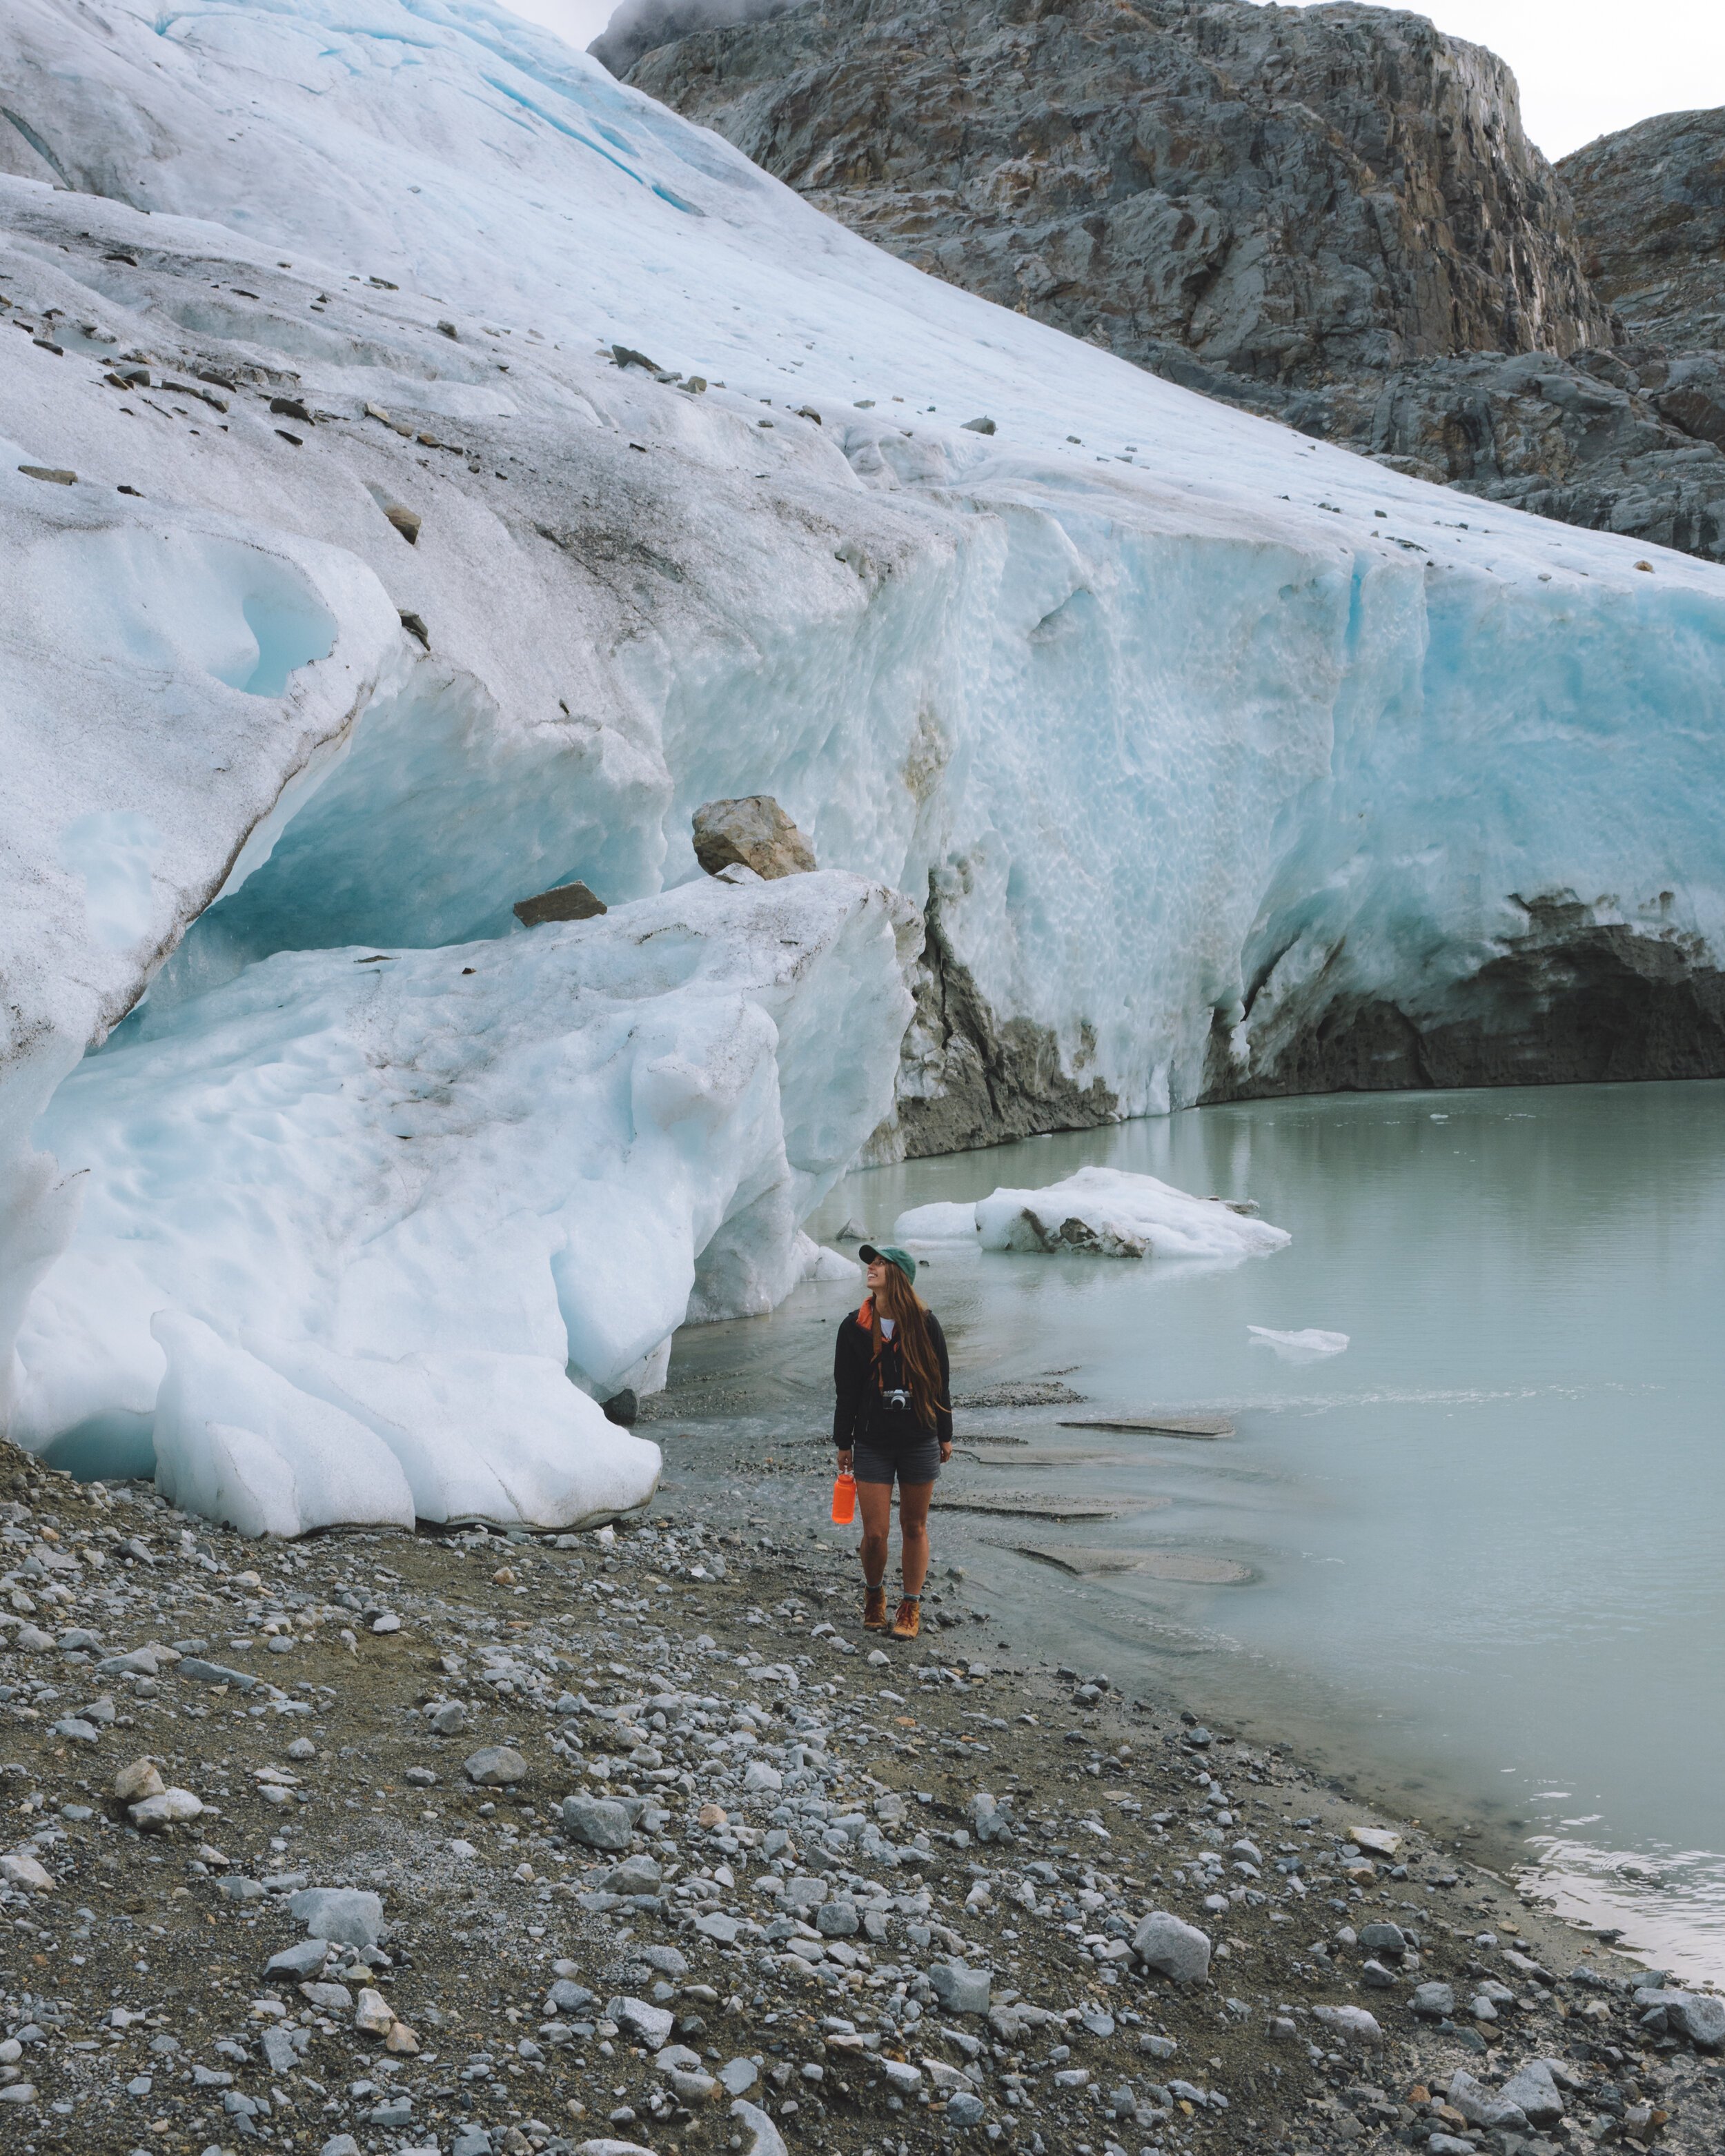
This trail is one that I would place in the category of “short but sweet” - it is 14km roundtrip with 1,200 meters of gain. You begin the hike at a large gravel parking lot (there is a pit toilet at the parking lot) and immediately start climbing through a lush green forest, the trail was re-built a few years ago and is in very good shape - although it can be slippery when wet. Parks BC gives an estimated one way hiking time of 4-7 hours, almost all of this will be in the forest. This is wonderful when it is raining as it adds protection from the elements as it did for our hike up(and then down the following day). The final 300 meters of gain are exceptionally steep (and very slippery when wet or snowy) but it is quick and within a few minutes you will crest over a small saddle and the entire Wedgemount basin will be in view (with the glacier in the very back on a clear day). There are twenty established campsites - ten up high near the emergency shelter and ten located 1km further along the shoreline. Please reserve these early - they sell out fast during the summer - and bring proof of your campsite as park rangers check these permits.
We had a later start to our hike than we typically would plan and did not make it to the trailhead until after lunch. However with the days still being on the longer side in early September we made it up to the shoreline campsite with ample sunlight to spare. We set up camp, hung our food at the provided bear hangers, and made our way over to the toe of the Wedgemount Glacier for dinner. With intermittent rain throughout our hike up and the forecast worsening by the hour we hiked back to camp and called it an early night. It rained throughout the evening and into the early morning. We packed up camp and hiked out in the morning thankful to have a planned hotel night in Whistler to dry out our gear and re-pack for our next adventure.

Packing Suggestions
Below is a quick list of the great that I packed for my overnight trip. As Wedgemount Lake is also popular as a day hike I included my day hiking basics with the added on list for overnight backpacking trips.
Hiking gear
Day trip:
Ten Essentials for Safety, Survival and Basic Comfort.
Backpack: This Patagonia Nine Trails backpack has been my go-to day pack for years. I love everything about it.
Reusable water bottle: I like my Nalgene for overnight trips and Hydro Flask for day hikes in the summertime.
Hiking boots: I love these Danner Boots for longer day hikes and backpacking trips and these Danner Trail Runners for shorter hikes.
Hiking socks: I like these Smartwool Ankle Socks
Base layer top: I typically wear a sports bra and then a lightweight long sleeve layer below my jackets. I personally don’t like wearing t-shirts hiking and find that a tank top is similar to just wearing a sports bra so why wear it.
Hiking pants: Fjällräven Nikka Pants
Tights: I wear these Gylder High Waist Tights a lot.
Hiking shorts: I have yet to find a pair of hiking shorts that fit me as well as these Eddie Bauers.
Warm jacket: Patagonia Down Sweater
Rain jacket: I own this Arc'teryx Zeta AR Jacket - it is very expensive but worth every penny.
Headlamp: I use an older version of this Petzl RL Headlamp.
Sunglasses: I wear exclusively the Remmy by Raen Sunglasses (in the smaller size)
First aid kit: Adventure Medical Mountain Series Medical Kit - backpacker
Emergency GPS locator: I use the Garmin InReach Mini
Water filter: SteriPEN UV Filter and Sawyer Squeeze Filter.
Bear spray: Counter Assault Bear Deterrent Spray + Holster - you can also check out my Bear 101 Blog for more safety tips.
Overnight additions:
Backpack: Fjällräven Kajka 55L
Tent: I love The North Face Triarch 2p tent - I bought this years ago and it is still my go-to.
Sleeping bag: This depends on the overnight temperature - I like to get a warmer bag than I think I will need just in case. My tried and true is this North Face Blue Kazoo 15F (women’s) bag.
Sleeping pad: Big Agnes Insulted AXL Sleeping Pad.
Camp pillow: I forgot my Pillowpackers Pillow on a recent trip and picked up a Sea to Summit Aeros in a pinch and love them both - if I have extra room I will go with the Pillowpackers but if I am tight on space the Sea to Summit works with a sweater wrapped around it.
Lantern: Constantly waking upon before sunrise and eating dinner in the dark I love having a small lantern in the tent.
Stove (and fuel): I know a lot of people prefer the Jet Boil, personally I use the MSR Pocket Rocket. It is smaller and also with the ability to swap out pots I find it more useful.
Pot: I use these Camp Pots and Pans (the lids can be used as a pan for frying morning eggs)
Utensils: I received this Long Handle Spoon with a Silicone Coating as a gift earlier this year - and it is a game changer!
Coffeecup: MiiR Camp Cup - everyone knows that these cups are glued to my hand at all times.
Camp booties: My new love - these Synthetic Camp Booties. I am even wearing them in my house as I write this blog.

A mini guide to waiting out a storm in Whistler, BC
The weather can turn very quickly and if you are looking for reprise (as we were) below are a few suggestions for coffee, food and a warm bed if you need a break from the rain.
Where to stay:
We booked a room at the Summit Lodge - a boutique hotel located in the heart of Whistler Village. It is a dog friendly hotel (check out their amazing pet policy including dog walking and pet sitting here) with a 24 hour co-working space, daily candy bar, beautiful outdoor swimming pool, hot tub sauna and fire pits and even a few resident gold fish that you can borrow in case you need a travel companion. As a bonus it also has showers that seem to be built for drying out wet camping gear (& I was blown away by their commitment to being eco-friendly).
What to eat:
Hunter Gather: Only a block away from our hotel this was where we had dinner while the rain refused to stop. It is built as a place to share stories, eat locally made food and enjoy awesome craft beer and wine and it did not disappoint.
Pasta Lupino: A tried and true recommendation from the sweet Hayden Korte-Moore is the Chicken Parm with spinach noodles with rose sauce. Order this - you will not regret it.
Mount Currie Coffee Co: A staple in both Whistler and Pemberton - cozy little spots with great coffee, fast wifi and ample plugs if you’re trying tog et some work done.
Camp Lifestyle + Coffee: Really great coffee. HOWEVER there is no wifi and very limited seating. I love swinging by to catch up with friends or on my way into or out of Whistler but it is not a shop built for getting things done.


*Please note that some of the links above are affiliate links, and I may earn a small commission on any purchase made - at no additional cost to you. As always, all ideas and opinions expressed in this post are entirely my own. Thank you for your support!


Larch trees are coniferous trees that lose their needles every fall. Before the needles drop they turn from green to a spectacular golden yellow. In Alberta, the variety that we see are alpine larches (Larix lyalli). Because they usually grow in groups at high elevations, the impact of their foliage display is nothing short of stunning. Larch season in the Canadian can be unpredictable in timing and short lived given our tumultuous weather patterns but typically they start to turn from green to yellow the middle of September and (barring no heavy wind, rain or snow storms) will last until mid-October. I have compiled a list of some of my favourite hikes to view larch trees in the Canadian Rockies at every skill level.